Welding defects can be classified as structural discontinuities and consist of: porosity, slag inclusions, lack of fusion, cracks, etc.
- Porosity is gas pockets or voids in the weld metal which are free of any solid materials, such as It is formed as a result of gases driven from the weld metal, excessive currents, excessive arc lengths, and improper preparation of the joint.
Porosity is generally classified into different groups as follows: scattered, clustered and linear.
- Scattered porosity occurs throughout the weld metal and the voids may vary in size from microscopic to slightly over 1/8 in.(3 mm). (Figure 6, below);
- Clustered porosity occurs in groups and may generally be associated with a change in welding conditions. (Figure 7, below);
- Linear porosity occurs throughout the length of a weld and the voids are in a line with respect to the axis of the weld. This type of porosity generally comes in the root pass and usually can be traced to the inadequate preparation of the joint. (Figure 8, below).

2. Slag inclusions can also form on a root pass of a V-groove weld, if the root opening is too small to permit the arc to heat the bottom of metal to a high enough temperature and allow the slag to float to the surface.(Figure 9, below).
The welder can create similar conditions to this, by having undercutting or excessive convexity in a weld bead, or using too large an electrode in the root.
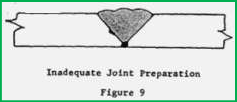
The inspector should realize that most slag can be prevented when the welder uses good sound welding practices, such as: proper preparation of the groove before each weld bead, be careful in correct contours inside specifications and the use of preheat to retard the weld metal solidification.
3. Lack of fusion is due to the failure of raising the temperature of the base metal out of the fusing point or the failure to dissolve by fluxing the oxides. The best inspection for incomplete fusion is ascertaining the surfaces to be welded, whether are free of all objectionable material. (Figure 10, below).
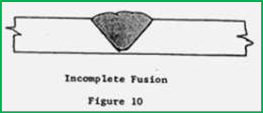
Most lack of fusion is due to inadequate joint preparation and to a heat transfer condition at the root of the joint rather than a failure to dissolve or flux surface oxides. When the portion of the base metal closest to the electrode is distant from the root, the heat transfer has to be made by conduction, which may be insufficient to attain the fusion temperature at the root.
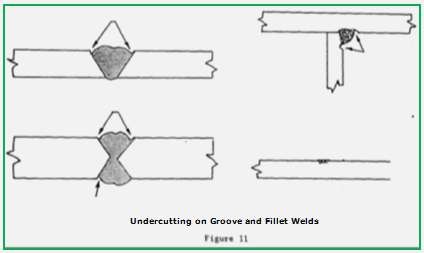
4. Undercutting, this term is used primarily to describe the reduction of the base metal thickness at a line where the last bead of weld metal is fused to the surface or at the toe of a weld. It can occur on V-grooves, fillet weldings and on the vertical leg of a horizontal fillet.
Undercutting of both types is usually due to a technique employed by the welder, although magnetic arc blow can also be a factor. Undercutting can be detected by visual inspection and a tolerance for it has been set up in the AWS under the Article, “Weld Profiles.” (Figure 11, below).
5. Cracks in welded joints are results of a localized stress that at some point has exceeded the ultimate strength (UTS) of the material. The well-known causes of cracks are:
The wrong use of electrodes, improper electrical conditions, travel speed and lack of preheat. Different types of cracks are: transverse, longitudinal, crater and base metal. The first three types are usually visible cracks that are easily found.
The base metal cracks are much more difficult and test methods may be required to discover them. Like the name implies, the cracks are in the base metal and sometimes are under the weld bead. (Figure 12, below).
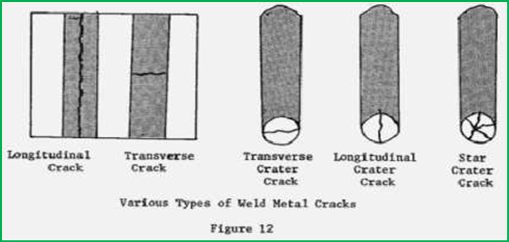
6. Crater cracks are small and usually star-shaped and found in the weld crater itself. They start at the center of the crater and extend out to the Crater cracks are not detrimental to the weld, when there are good conditions to be repaired.
Various types of surface irregularities may occur during welding. These irregularities can vary from actual holes in the weld to surface roughness of the metal or excessive spatter. Improvement of these conditions is usually obtained by changing the electrical conditions.
Good welding practice dictates the removal of crater cracks by grinding or chiseling. The surface appearance of the weld generally reflects the ability and experience of a welder. However, good welding, but poorly finished welding defects should not be refused, except under unusual conditions or the integrity of the job is necessary and beyond question.
we provide standard specifications for welding procedures for all welding process and Brazing. We offer Welder Procedure Specification, Welder Certificate Renewal Process, Procedure Qualification Record, Welder Qualification Testing, welder Training and Welder qualification services in Coimbatore, Trichy, Salem, Erode, Chennai.
Please feel free to reach us https://aqcinspection.com/training/ to learn more about any of the methods in detail.
Visit our technical and career updates at our Blog site https://advancedqualitycentre.blogspot.com . or
https://ndtcenter.blogspot.com
