Rockwell Superficial Hardness Test:
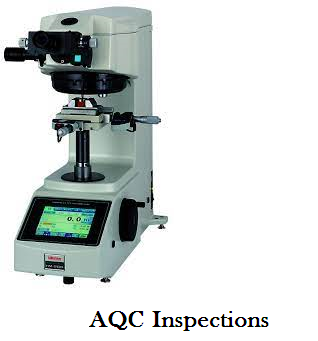
The Rockwell Superficial Hardness Tester is used to test thin materials, lightly carburized steel surfaces, or parts that might bend or crush under the conditions of the regular test. This tester uses the same indenters as the standard Rockwell tester but the loads are reduced.
A minor load of 3 kilograms is used and the major load is either 15 or 45 kilograms depending on the indenter used. Using the 1/16″ diameter, steel ball indenter, a “T” is added (meaning thin sheet testing) to the superficial hardness designation.
An example of a superficial Rockwell hardness is 23 HR15T, which indicates the superficial hardness as 23, with a load of 15 kilograms, using the steel ball.

Vickers and Knoop Micro hardness Tests:
The Vickers and Knoop Hardness Tests are a modification of the Brinell test used to measure the hardness of thin film coatings or the surface hardness of case-hardened parts.
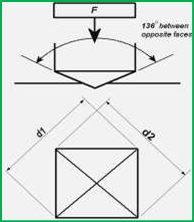
The Vickers test is performed with a small diamond pyramid pressed into the sample under loads that are much less than those used in the Brinell test.
The difference between the Vickers and the Knoop Tests is simply the shape of the diamond pyramid indenter. The Vickers test uses a square pyramidal indenter and commonly used to characterize very hard materials but the hardness is measured over a very small region.
Consequently, the Knoop test uses a rhombic-based (diagonal ratio 7.114:1) pyramidal indenter
which produces longer but shallower indentations. For the same load, Knoop indentations are about
2.8 times longer than Vickers indentations.
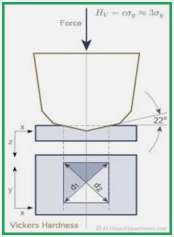
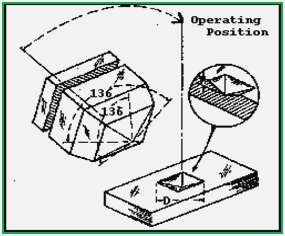
An applied load ranging from 10 g to 1,000 g is used. This low amount of load creates a small indent that must be measured under a microscope. The measurements for hard coatings must be taken at very high magnification (i.e. 1000X), because the indents are so small.
The surface usually needs to be polished. The diagonals of the impression are measured, and these values are used to obtain a hardness number (VHN), usually from a lookup table or chart.
The values are expressed like 2500 HK25 (or HV25) meaning 2500 Hardness Knoop at 25 gram force load. The Knoop and Vickers hardness values differ slightly, but for hard coatings, the values are close enough to be within the measurement error and can be used interchangeably.
Scleroscope and Rebound Hardness Tests:
The Scleroscope test is a very old test that involves dropping a diamond tipped hammer, which falls inside a glass tube under the force of its own weight from a fixed height, onto the test specimen. The height of the rebound travel of the hammer is measured on a graduated scale.
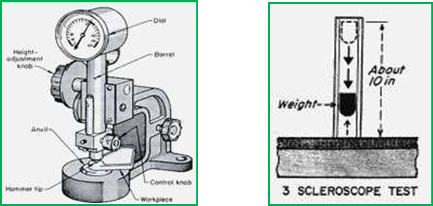
The scale of the rebound is arbitrarily chosen and consists on Shore units, divided into 100 parts, which represent the average rebound from pure hardened high-carbon steel. The scale is continued higher than 100 to include metals having greater hardness.
The Shore Scleroscope measures hardness in terms of the elasticity of the material. The hardness number depends on the height of the hammer, the harder the material, the higher the rebound.
The Rebound Hardness Test Method is a recent advancement that builds on the Scleroscope. There are a variety of instruments on the market that measure the loss of energy of the impact body.
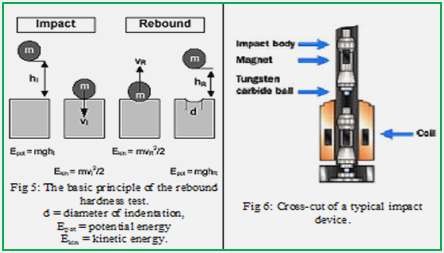
These instruments typically use a spring to accelerate a spherical, tungsten carbide tipped mass towards the surface of the test object. The kinetic energy and the impact produce an indentation (plastic deformation) on the surface which takes some of this energy from the impact body.
The impact body will lose more energy and it rebound velocity will be less when a larger indentation is produced on softer material. The velocities of the impact body before and after impact are measured and the loss of velocity is related to Brinell, Rockwell, or other common hardness value.
Durometer Hardness Test:
A Durometer is an instrument that is commonly used for measuring the indentation hardness of rubbers/elastomers and soft plastics such as polyolefin, fluoropolymer, and vinyl.
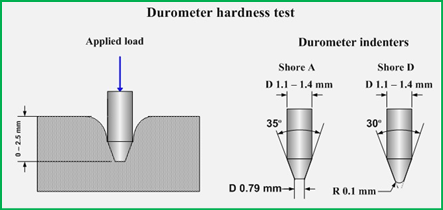
A Durometer simply uses a calibrated spring to apply a specific pressure to an indenter foot. The indenter foot can be either cone or sphere shaped. A device measures the depth of indentation.
Durometers are available in a variety of models and the most popular testers are the Model A used for measuring softer materials and the Model D for harder materials.
Barcol Hardness Test:
The Barcol hardness test obtains a hardness value by measuring the penetration of a sharp steel point under a spring load. The specimen is placed under the indenter of the Barcol hardness tester and a uniform pressure is applied until the dial indication reaches a maximum.
The Barcol hardness test method is used to determine the hardness of both reinforced and non- reinforced rigid plastics and to determine the degree of cure of resins and plastics.

Creep and Stress Rupture Properties:
Creep is a time deformation of a material while under an applied load that is below its yield strength and often occurs at elevated temperature, but some materials creep at room temperature.
Creep terminates in rupture if steps are not taken to bring to a stop. Creep data for general design use are usually obtained under conditions of constant uniaxial loading and constant temperature.
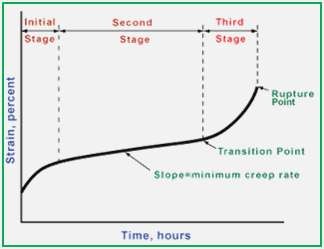
As indicated in the image, creep often takes place in three stages. In the initial stage, strain occurs at a relatively rapid rate but the rate gradually decreases until it becomes approximately constant during the second stage.
The constant creep rate is called the minimum creep rate or steady-state creep rate since it is the slowest creep rate during the test. In the third stage, the strain rate increases until failure occurs.
Creep in service is usually affected by changing conditions of loading and temperature and the number of possible stress-temperature-time combinations is infinite.
While most materials are subject to creep, the creep mechanism is often different between metals, plastics, rubber, concrete.
We provide Hardness Testing and all other mechanical testing services all over Tamilnadu.
Please feel free to reach us https://aqcinspection.com/training/ to learn more about any of the methods in detail.
Visit our technical and career updates at our Blog site https://advancedqualitycentre.blogspot.com . or
https://ndtcenter.blogspot.com
